Moving data the wrong way can cost you time, money, and trust. Mid‑size firms often think a "big‑bang" cut‑over is fastest, yet research shows incremental CDC‑based moves can match that speed while keeping data fresh. In this guide we walk you through five usable steps so you can design a data migration strategy that fits your budget, timeline, and risk tolerance.
By the end you’ll know how to map your current landscape, set clear goals, pick the right approach, run a pilot, and automate the full move. Let’s get started.
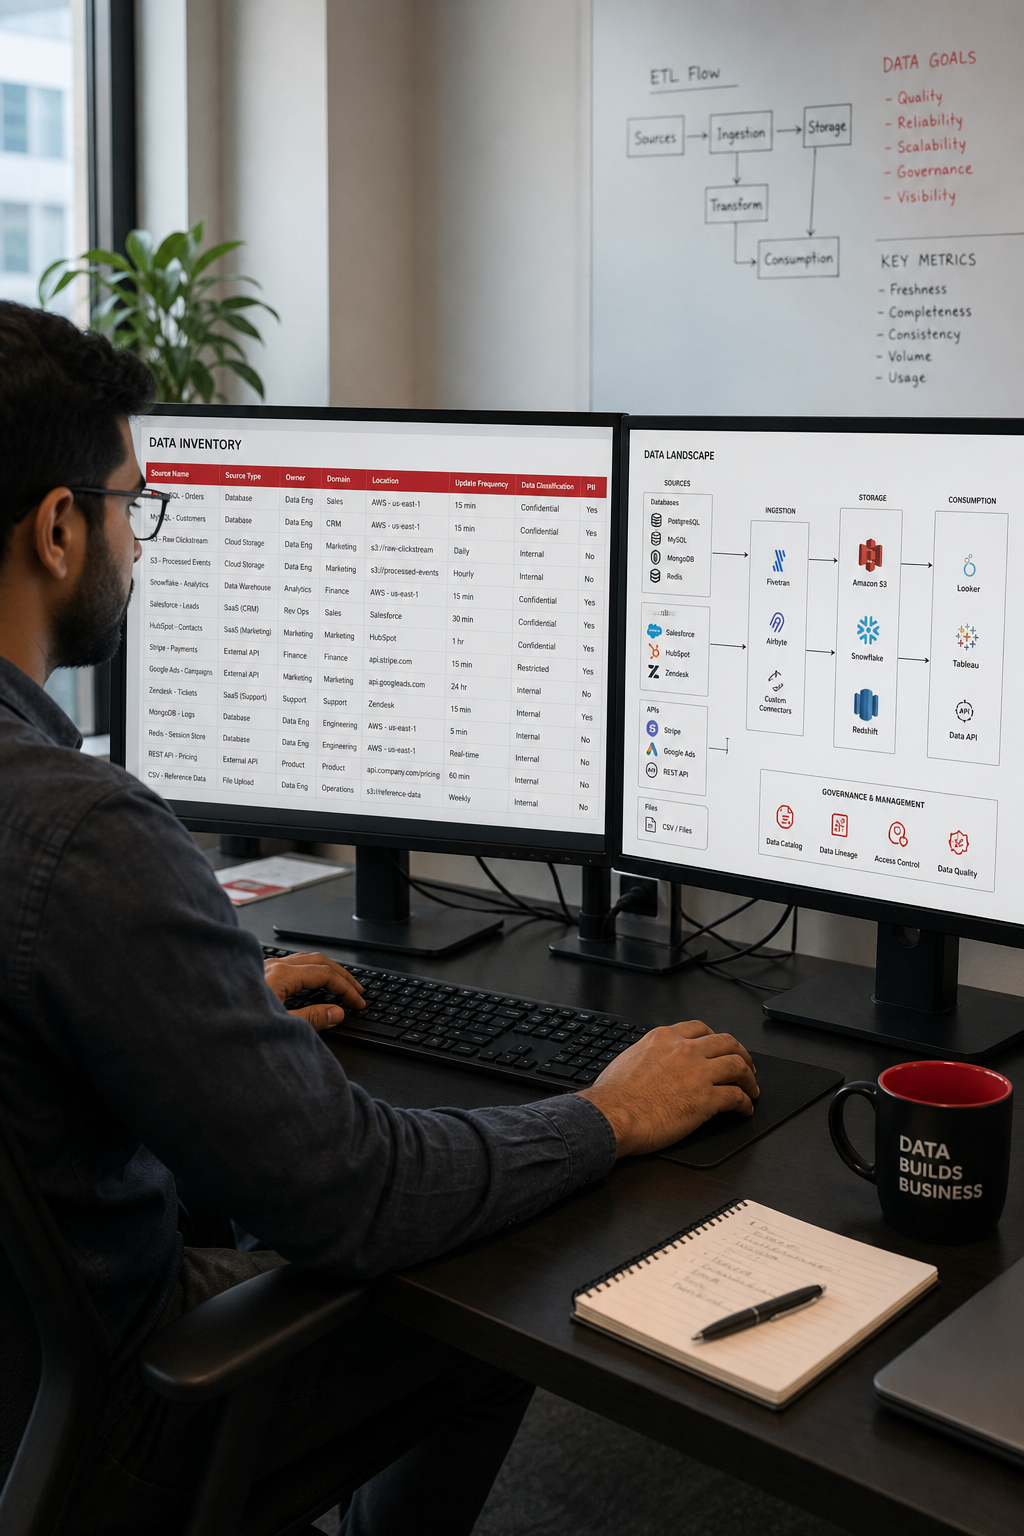
Step 1: Assess Your Current Data Landscape
The first thing you must do is get a clear picture of where your data lives today. Without a map you’ll wander in the dark and waste precious resources.
Start with a full inventory. List every database, file system, cloud bucket, API, and third‑party service that holds data you care about. Note the data volume, format, and owner for each source.
Next, dig into the dependencies. Which tables feed which reports? Which pipelines run nightly jobs? Capture custom scripts, stored procedures, and any legacy ETL jobs. This depth helps you spot hidden bottlenecks before they become show‑stoppers.
Ask yourself: are there performance issues on any source? Is there outdated hardware that could slow extraction? Do any data sets contain personal or regulated information that needs extra safeguards?
We like to group the findings into three buckets: assets, quality, and risk. Assets are the raw objects you’ll move. Quality covers profiling results , missing values, duplicate rows, schema drift. Risk flags items that could cause compliance or downtime problems.
Once you have the inventory, compare it against your target environment. Are you moving from on‑prem to cloud? From one SaaS app to another? The answer will shape the tools you need.
Security and compliance also belong in this assessment. Review current access controls and audit logs. If you store health records, verify HIPAA coverage. If you handle EU citizen data, check GDPR clauses. Align the future‑state security model with these requirements.
Finally, bring the right people into the conversation. Business analysts, data engineers, security officers, and even end‑users should weigh in. Their input prevents blind spots later on.
By the end of this step you should have a living document , a data map , that lists every source, its owner, volume, format, and any red flags. This map is the foundation of any solid data migration strategy.
Step 2: Define Migration Goals and Scope
With a clear inventory in hand, it’s time to ask what you want to achieve. Goals turn a vague project into a measurable plan.
Typical goals include:
- Reduce operational cost by moving to a lower‑price cloud tier.
- Enable real‑time analytics by consolidating data into a modern warehouse.
- Meet regulatory deadlines for data residency.
- Improve data quality by cleaning and standardizing during the move.
Each goal should be SMART , specific, measurable, achievable, relevant, and time‑bound. For example, “cut storage cost by 20 % within six months of migration” gives you a clear success metric.
Next, set the scope. Not every table needs to move at once. Identify high‑value datasets (customer orders, financial records) that must be live immediately. Flag low‑priority archives that can be migrated later or even retired.
Stakeholder alignment is critical. Draft a one‑page charter that lists the goals, scope, timeline, budget, and owners for each workstream. Share it with the business leads, security team, and IT ops. Their sign‑off prevents scope creep.
When you define the scope, also outline the migration windows you can tolerate. Can you afford a few hours of downtime? Or do you need a zero‑downtime approach? The answer will steer you toward a big‑bang or phased approach later.
Data governance should be baked into the goals. Decide who owns each dataset after migration and what quality thresholds must be met. A simple RACI matrix helps clarify responsibilities.
Finally, capture success criteria. Beyond cost savings, list concrete checkpoints such as “99.9 % data match after cut‑over” or “no more than three data‑quality incidents in the first month.” These metrics will guide validation later.
We often reference Maintenance & Support - Lakeway Web Development as an example of a service that helps firms keep data pipelines running smoothly after migration. Their approach illustrates how post‑migration support can be part of the overall goal set.
Step 3: Choose the Right Migration Approach
Now that you know what you need and why, pick the method that fits your risk profile and timeline. The two most common strategies are big‑bang and gradual (also called phased or CDC‑based).
Big‑bang moves everything in a single window. It’s fast, but any mistake can cause a full outage. Gradual migration slices the data into logical chunks, lets you run both old and new systems side‑by‑side, and reduces impact.
Here’s a quick decision matrix:
Real‑world example: a midsize e‑commerce firm migrated its order database using a gradual approach because sales run 24/7 and any downtime would lose revenue. They used CDC to sync changes until the new system proved stable.
When you choose an approach, also pick the right tooling. For lift‑and‑shift or big‑bang moves, cloud‑native services from major providers work well. For CDC‑based replication, dedicated migration tools provide connectors that capture changes in near real‑time.
Make sure the tool you pick supports your source and target platforms. Check integration lists early to avoid a last‑minute scramble.
After you decide, document the approach in a migration playbook. Include a step‑by‑step runbook, rollback procedures, and clear hand‑off points between teams.
We also like to look at UX/UI Design - Lakeway Web Development for ideas on how a clean user interface can help monitor migration dashboards and reduce operator error.
Step 4: Execute a Pilot Migration and Validate
A pilot lets you test the whole pipeline on a small, representative slice of data. It catches hidden bugs before you move the full dataset.
Pick a low‑risk but critical subset , maybe a single department’s data or a few months of transaction records. Run the full extract‑transform‑load (ETL) process on this set.
Validate at three levels:
- Schema match:Ensure column names, types, and constraints line up between source and target.
- Data fidelity:Compare row counts and checksum hashes to confirm nothing was lost or altered.
- Functional checks:Run downstream reports or analytics on the migrated data to see if they produce the same results.
Automation helps here. Use a testing framework that can run white‑box checks (logic validation) and black‑box checks (business outcome validation). A testing guide from a reputable source outlines a solid checklist you can adapt.
Document every issue you encounter. Categorize them as data quality, performance, or tooling gaps. Then refine your ETL scripts, adjust transformation rules, or tweak the CDC configuration.
Once the pilot passes all checks, you have a validated blueprint. Scale it up by adding more data slices, increasing concurrency, and extending the monitoring windows.
Step 5: Automate and Monitor the Full Migration
Automation is the engine that keeps large migrations on track. Manual scripts are error‑prone and hard to scale.
Start by codifying the ETL workflow in a tool that supports version control and scheduling. Workflow orchestrators, cloud ETL tools, or cloud‑based ETL platforms let you define each step as a reusable component.
Set up monitoring early. Track key metrics such as data‑throughput (records per second), latency (time from source change to target reflect), and error rates. Alert on thresholds that exceed your risk tolerance.
Use a dashboard to get a real‑time view of progress. A cloud migration dashboard, for example, shows source and destination status, elapsed time, and any failures in one place. The provider’s guide walks you through setting it up.
Don’t forget compliance checks. Run automated validation scripts that verify data matches the defined quality thresholds. Log every transformation for audit purposes.
Build a rollback plan. If a batch fails, you should be able to revert to the last good snapshot without affecting downstream users. Snapshot technology (like cloud‑based file‑level snapshots) makes this easier.
After the cut‑over, keep the old system in read‑only mode for a grace period. This gives you a safety net to reconcile any missed records. 
Finally, hand over the new environment to operations. Provide runbooks, training sessions, and a clear escalation path. Ongoing monitoring should continue for at least one month to catch any post‑migration drift.
Our team at Lakeway Web Development often helps clients set up this automation layer, ensuring the migration runs smoothly and stays within budget.
Frequently Asked Questions
What is the difference between a big‑bang and a phased data migration?
A big‑bang migration moves all data in a single, scheduled window. It can be fast but carries higher risk because any error can affect the entire system. A phased migration breaks the move into smaller chunks, allowing the old and new systems to run in parallel. This reduces downtime and lets you validate each segment before proceeding, which is especially useful for regulated or high‑availability environments.
How do I estimate the timeline for a data migration?
Start with a data inventory to calculate total volume and complexity. Add time for profiling, cleansing, and transformation. Then factor in testing cycles and any required downtime windows. For midsize firms, lift‑and‑shift projects often finish in 8‑12 weeks, while phased CDC‑based approaches can take 2‑4 months, according to industry research.
What tools can help with change‑data‑capture (CDC) during migration?
Popular CDC tools include a range of cloud‑based data replication services and change‑feed features of modern data platforms. They capture inserts, updates, and deletes in near real‑time, keeping source and target in sync while you transition workloads. Choose a tool that supports both your source and target platforms and offers built‑in monitoring.
How can I ensure data quality throughout the migration?
Run profiling jobs before migration to flag nulls, duplicates, and out‑of‑range values. Define validation rules for each dataset and apply them both during the pilot and full migration. Automated test suites can compare source and target row counts, checksums, and business‑logic outcomes to catch drift early.
What should be included in a migration rollback plan?
A rollback plan must specify the point‑in‑time snapshot to revert to, the steps to restore the snapshot, and the verification process to ensure the system is back to its pre‑migration state. Document who triggers the rollback, how communication will happen, and how long the recovery window is expected to be.
How do I handle regulatory compliance when migrating data?
Map each data element to its regulatory requirement (e.g., GDPR, HIPAA). Encrypt data in transit and at rest, and maintain audit logs of who accessed what during migration. Use tools that provide built‑in compliance reports, and run a final compliance audit before decommissioning the old system.
Can I reuse existing ETL jobs for the migration?
Sometimes you can repurpose existing jobs, but they often need adjustments for new schemas or target platforms. Test each job in a sandbox environment first. If the jobs were built with a vendor‑specific language, consider migrating to a more portable tool to avoid lock‑in.
What metrics should I track during migration?
Key metrics include data throughput (records/second), latency (source‑to‑target delay), error rate (% of failed records), and data‑match percentage (source vs. target). Monitoring these helps you spot bottlenecks early and keep the project on schedule.
Conclusion
Building a data migration strategy isn’t a one‑size‑fits‑all task. It starts with a solid assessment, moves through clear goal‑setting, chooses the right approach, validates with a pilot, and ends with full‑scale automation and monitoring. By following the five steps above you can reduce risk, keep costs in check, and stay compliant.
Remember, the data map you create in Step 1 is the north star for the entire project. Align every decision , from tool selection to downtime windows , with the goals you defined in Step 2. Use a pilot to surface hidden issues before they affect production, and lean on automation to keep the migration moving at pace.
At Lakeway Web Development we partner with midsize businesses to design and execute custom migration plans that fit their unique needs. If you’d like a deeper look at related topics, on ChatGPT Integration - Lakeway Web Development, which shows how AI can help automate data validation and post‑migration support.
With a well‑crafted strategy, your data will flow smoothly into its new home, ready to power the next generation of insights and applications.